Dan Toma - YO3GGX - yo3ggx@gmail.com
This is a very simple to use multi-platform Java application which can be used to redirect one of your computer serial ports and audio channel to an Ethernet connection. Using jAReC you are able to connect to any serial port (Computer embedded, USB/Serial adapter or Bluetooth adapter) remotely over the network along with a bi-directional audio channel (by using a special client). Some of my Android applications, are able to serially connect over Ethernet so this can be useful addition. My PocketRxTx Android application can use the secure login authentication feature to securely connect and control (CAT) your radio transceiver remotely over Internet, including audio support.
The current version of the application has the following features:
Can be run on Windows, Linux or Mac (with Java Runtime installed).
The application is fully portable, nothing is modified in the Registry and requires only the executable (JAR) file and a simple text configuration file.
You can select any local serial port (COMx in Windows, /dev/ttySx or /dev/ttyUSBx in Linux, etc).
You can select Audio In and Audio Out devices from a list. The audio feature is bi-directional, with mic and speaker level indicators for better control.
The program displays your local IP address.
The TCP port used for the remote connection is configurable. The UDP port of the same number is used for audio, if audio is activated.
The Baudrate is configurable from 110 to 921600.
Settings are saved in a configuration file, and are loaded automatically the next time the program is started.
The program can be automatically started allowing unattended mode operation.
It auto disconnects if the network link is lost and goes back to “waiting for connection” status.
When jAReC is being used to control a transceiver PTT control can be done over CAT or through RTS or DTR signals, on the same serial port used for CAT controls or on a different one.
There is a user configurable PTT timeout setting, in order to prevent PTT locking in Tx if the network link drops during transmission.
Custom commands/scripts can be set as CAT commands (only available when using jAReC with the Pro version of Pocket RxTx).
A Monitor mode is built in to help you, if you wish to write your own radio config files for use with PocketRxTx (the program monitors and displays the data sent/received over the serial CAT port).
Audio is sent over UDP which provides lower latency. The same port number as used by CAT command transfer is used.
IMPORTANT!!!: When using jAReC with Pocket RxTx (free or PRO), you must ensure both pieces of software are at the same version number. To find current version, use Help > About in jAReC or short press on the application name on the startup page in Pocket RxTx.
Current version of the application has the following known limitations:
Cannot be run as a Service without extra configuration work by the user.
WARNING!!!
Use this application at your own risk. I cannot be held responsible for any damage caused to your system by use of this program.
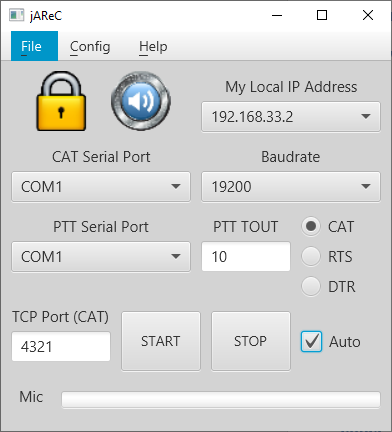
To start the application in Windows, as long as you have previously installed the Java Runtime (from Oracle), just may simply click on the file (jAReC.jar). The following window will appear:

Using a terminal enter the following command when you are in the folder containing the program file:
java –jar jAReC.jar
NOTE: With java runtime version 9, you may get the following error:
ES2 Prism: Error - reported GLX version = 1.2
GLX version 1.3 or higher is required
If this situation occurs, run the application using the following command:
java -Dprism.order=sw -jar jAReC.jar
A window similar to this one will appear:
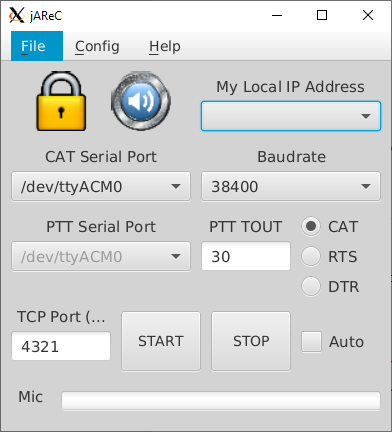
Using a terminal enter the following command when you are in the folder containing the program file:
java –jar jAReC.jar
A window similar to this one will appear:
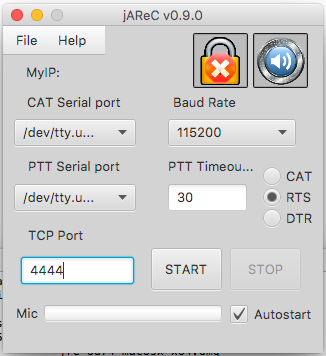
NOTE: This application is not yet compatible with Java 9, so please use the latest available 8u version. Currently was tested with Java SE Runtime Environment 8u192 downloaded from here.
From the Config menu select “Security”. You will get a window similar to this one (on all platforms):
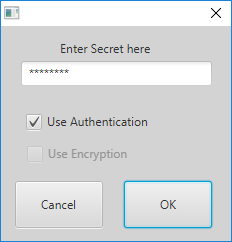
Check to select/unselect authentication. Encryption is not available in the current version, only secure login authentication. Authentication is de-selected by default. Enter a secret password in the white entry field. This must be a string longer than 3 chars and cannot contain a ‘*’ char. When you are ready click “OK”.
From the Config menu select “Audio”. You will get a window similar to this one (all platforms):
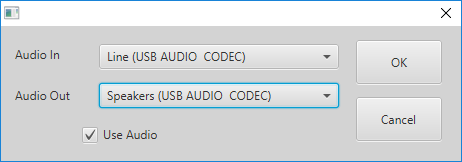
You need to select Audio In and Audio Out devices to point to the audio interface required. When using this with PocketRxTx it will be the interfaces connected to the transceiver.
Check “Use Audio” and press OK.
From the File menu select “Custom Cmd”. You will get a window similar to this one (on all platforms):
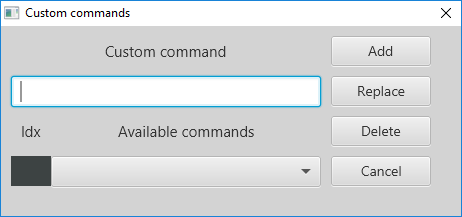
To add a new custom command, enter the command/script with the full path in the text box, then press “Add”. The command will be saved using the first available index, ‘02’ in the first available.
Use this index to assign the command in Pocket RxTx Pro, as “Command02”.
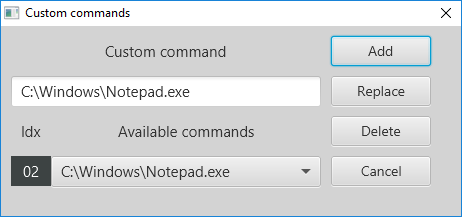
In this example, when “Command02” is executed by pressing an option button in Pocket RxTx Pro, Notepad is launched on the PC where jAReC runs.
You can select from the dropdown box any already saved custom command and edit it. When you finish editing, press “Replace”. You can delete a selected command by pressing “Delete”. When you are finished, click “Cancel” to return to the main window.
For custom command definitions that have backslash or colon in them (such as windows command line) please use “/” instead of “\” and replace “:” by “*”.
When you hover the mouse over one of the windows controls a tooltip will be displayed to better describe the function of that control.
In order to use the application, you will need to configure the following parameters:
Serial port (COMx for Windows, /dev/ttyUSBx / or /dev/ttySx for Linux, tty.usbserial for Mac).
This port will be used for CAT or CAT and PTT if you choose to control PTT through RTS or DTR signals from the same port.
|
Windows |
Linux |
Mac OS |
|
|
|
|
Baudrate. You have the following available speed options: 110, 300, 600, 1200, 2400, 4800, 9600, 14400, 19200, 38400, 57600, 115200, 128000, 256000, 460800 and 921600.
For remote control of a rig, if your transceiver does not have an “auto” mode you will need to select the same Baudrate as in your transceiver’s CAT menu.
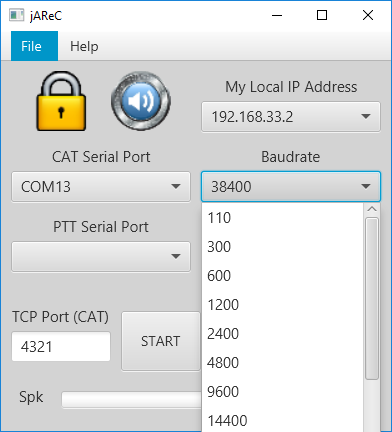
TCP Port. This can be any integer value between 1 and 65535. This computer will listen on this port for network traffic to be redirected to the serial interface. If the serial port is in use, you will get an error message when the program tries to start listening.
NOTE: Please be aware that if you also wish to stream bi-directional audio, The UDP port of the same number as the selected TCP port is used, so it must also be free.
PTT Serial port. This field is only enabled if you select PTT over RTS or DTR signals. You can select the same serial port as used for CAT commands or a different one, depending on your specific CAT interface. Many interfaces use 2 serial ports, one exclusive for CAT and the other one just for PTT (usually through RTS signal).
PTT Timeout[s]. Here you can enter the timeout for PTT, in seconds. You can enter any integer value between 1 and 65535 seconds. A timer will be started each time you press on PTT remotely in PocketRxTx. When the time set expires, PTT will be switched off automatically, even if you continue to keep PTT pressed. This is to ensure the rig is not left on transmit if the network connection drops.
CAT/RTS/DTR. These are options to set how the PTT command should be transmitted to the radio - through a CAT command or by applying a signal to serial port pin (RTS or DTR). If RTS or DTR is selected, you can the RTS or DTR lines from the same serial port as used for CAT commands or a different one.
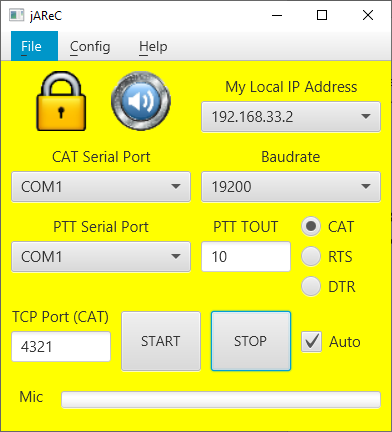
After you have configured all 3 parameters, click the START button to start listening for a network connection on the defined port. If the chosen serial port is free, then the computer will start listening on the network port and the window background will change to yellow:
The IP address of the computer will be displayed in the field “My Local IP Address” when you press the down arrow at the end of this field.
NOTE: If your computer has multiple IP addresses, only the first one is displayed.
You can now remotely connect to that socket (a socket is the pairing of IP address and TCP port, for example: 192.168.33.2:4444). When using PocketRxTx this is done in the background for you, as long as you have configured the network panel correctly in that Android App.
The application window background will be yellow when listening for remote connections.
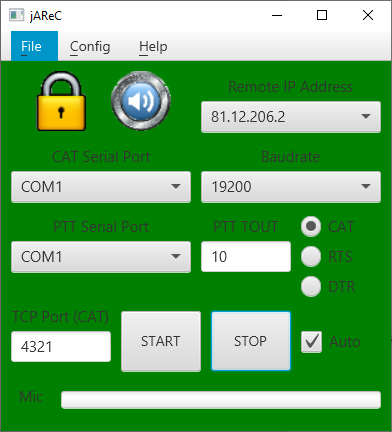
When the remote connection is established successfully, the window background will change to green and the remote IP address will be displayed instead of local IP, as shown in the following picture:
All the parameters are now saved in the configuration file. If you close and then restart the application, the form will be automatically filled from the saved parameters, so there is no need to configure them again.
If you want that the application to automatically goes into the listening mode when started, check “Autostart”. (this is useful in an unattended situation where you are not present to press the “Start” button).
At any time, if you click on STOP button, the connection will be dropped and the window background will go back to gray.
When transmitting (PTT pressed in Pocket RxTx), the background will go red and the microphone audio level will be shown as a bar graph, in the lower part of the window.
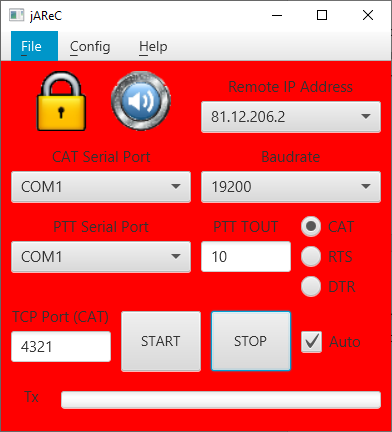
A bargraph in the lower part of the screen is used to display audio level. The label changes from Spk (for Rx audio level) to Mic (for Tx audio level) as appropriate.
You can simultaneously start several instances of the jAReC application, one for each serial port you want to give access to through the network. For example, if you have multiple transceivers, you can start one instance if the application for each of them. The only requirement is to use different TCP port for each connection, in order to have unique network sockets.
The serial Port can be not only a local physical serial port (like the physical RS232-COM on the motherboard or a USB/Serial interface) but also a virtual COM port, for example the one created by a Bluetooth interface. You can hence use jAReC to connect to your Bluetooth serial device over the network.
When you first download the Java application from my web site, there is no configuration file. This is automatically created when jAReC is first run. The configuration file resides in the same folder as the jar file. You can edit the configuration file using a simple text editor (do not use a Word processing program as their formatting can render the file unusable). The filename is jsn.cfg and the format is shown below:
#Wed Sep 21 17:12:29 EET 2016
bUseAuthentication=true
bUseEncryption=false
iPTTtimeout=30
sBaudrate=38400
sPTTport=COM2
bAutostart=false
iPlayInterface=4
PTT=RTS
sCOMport=COM9
bUseAudio=true
iRecInterface=8
sHSecret=2743C71E3828333B277A8FE65050595BF13DD669
nwPort=4444
bRTSpower=true
bDTRpower=false
Command02=C*/Windows/Notepad.exe
Each parameter is self-explanatory, and correspond to the parameters entered via the GUI. The authentication/encryption password (secret) is stored as a SHA-1 hash, so there is no way to read it from the configuration file.
For any custom command definition, use “/” instead of “\” when you run jAReC on Windows and replace “:” by “*””.
Some CAT interfaces require that RTS or DTR line from the COM port to be set in a high state. You can do this from the config menu.
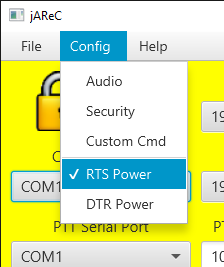
Check the line you want to be active. This is saved in the application configuration file.
To use this function, you must first configure the network configuration between jAReC and Pocket RxTx. Click here to learn how to do it in jAReC and check the PocketRxTx documentation for the needed settings in that App.
From the File menu select “Cfg Imp/Exp”. The main application window turns cyan. This means that jAReC is waiting for commands from Pocket RxTx.
Once jAReC is waiting for files as described above, to transfer files from Pocket RxTx to the PC where jAReC is running. In the startup page of Pocket RxTx, click on the OPT button, then on EXTRA, then finally on CFG EXP. You will be prompted to confirm that jAReC is in Cfg Imp/Exp mode.
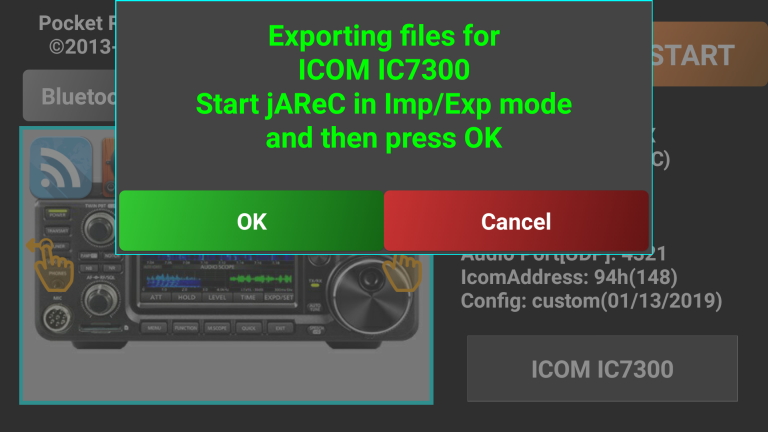
Click OK. A short message will be displayed for each transferred file. As soon as the transfer is completed, jAReC will go back in listening for connection mode (not file transfer mode). All of the transferred files will now be available in a subfolder of jAReC folder, named “configs”. If this folder does not initially exist, it is automatically created when jAReC starts.
The following files are transferred (if available on the android device):
All available radio configuration files (*.radio)
All available radio picture files (*.jpg)
All available radio profile files (*.prf)
All available memories files (*.mem)
Call log file if available (*.adi)
debug.log file, if available. This is only available if debug mode was activated in Pocket RxTx.
You can now edit or backup all of the transferred files on your PC.
To export files from the PC where jAReC is running to the Android device running Pocket RxTx, in the startup page of Pocket RxTx, click on the OPT button, then on EXTRA and then on CFG IMP. You will be prompted to confirm that jAReC is in Cfg Imp/Exp mode.
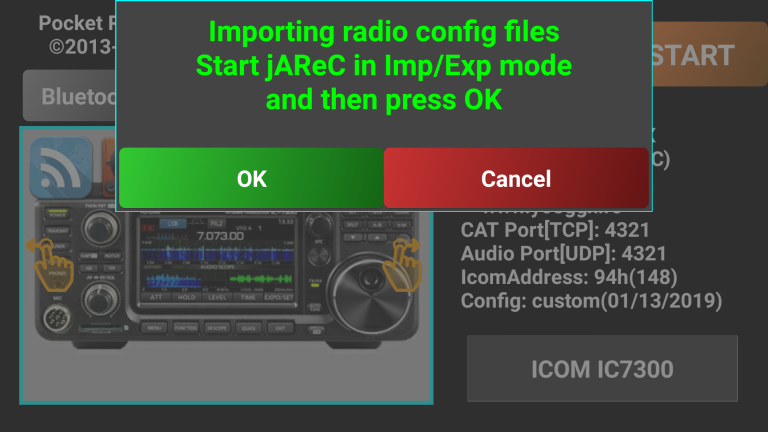
Click OK. A short message will be displayed for each transferred file. As soon as the transfer is completed, jAReC will go back in listening for connection mode (not file transfer mode).
The following type of files are transferred to the Android device (if present in the “configs” subfolder):
All available radio configuration files (*.radio)
All available radio picture files (*.jpg)
All available radio profile files (*.prf)
All available memories files (*.mem)
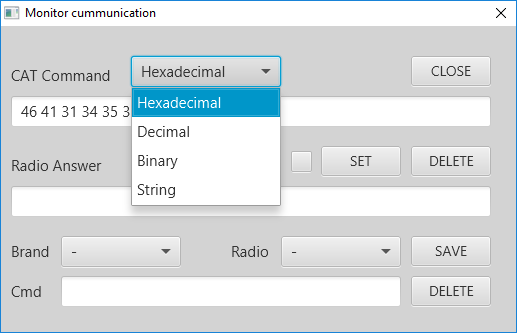
From the File menu select “Monitor”. This function is available only when a network connection from Pocket RxTx is active (green background). When in Monitor mode, jAReC does not send any commands through to the serial porto . The background changes colour to to cyan, to indicate you are in Monitor mode. Serial data sent over the network is displayed on the screen. This mode will help you check and validate CAT command definitions in Pocket RxTx. This is especially useful when checking data when radio feedback is activated. The monitoring screen looks like the following image.
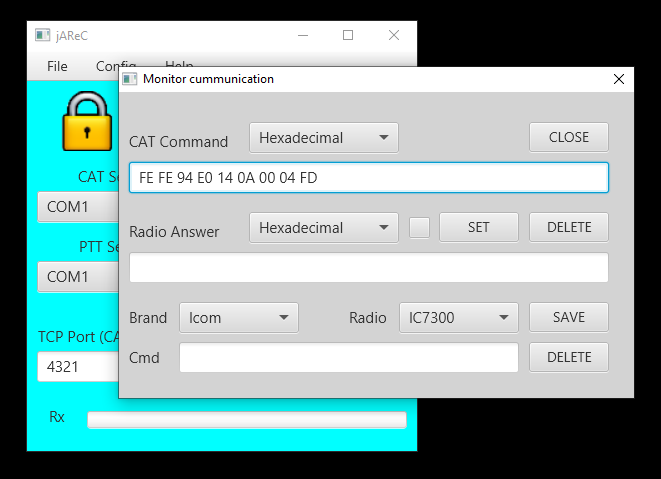
To monitor data from PocketRxTx, press one of the option buttons or tune to a specific frequency. Only the last command executed will be displayed. Let’s take for example manual tuning to 145.225MHz with an Yaesu FT-991. By default, the command is displayed in HEX format.
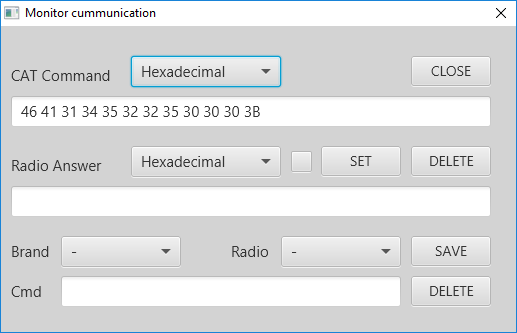
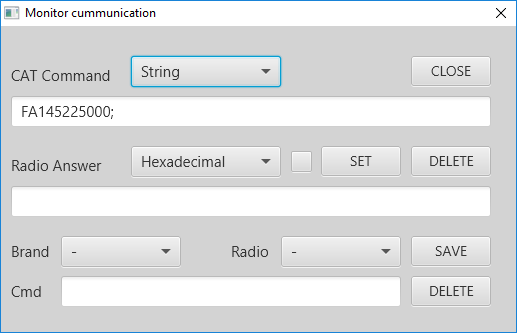
For the FT-991, the default CAT command definition is based on strings. From the CAT command dropdown box, you can select the display mode: Hexadecimal, Decimal, Binary or string.
We will select String in this case. The received command will be displayed now in this format;
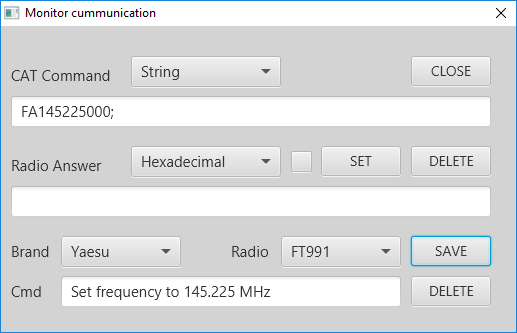
You can save the command for future reference. Select from the Brand drop down listYaesu, from the radio FT-991 and name of the command “Set frequency to 145.225MHz”, then click on “Save”. This definition will be saved in the configuration file.
Next time this command is received, the parameters in the lower fields will be automatically displayed.
To test a feedback command, set the POLLING command in the Pocket RxTx config file for this radio model to receive feedback for only one parameter (ex. Frequency).
POLLING=CMD_READ_FREQ_VFO-A
We will now activate feedback to PocketRxTx for a moment. This will enable us to provide the response to the CMD_READ_FREQ_VFO-A command. In the “Radio Answer” text field we enter the answer expected from the radio. Referring to the Yaesu CAT manual, we see the following:

In this case, read command received is ‘FA;’ Let’s consider that the radio returned the frequency 3.705MHz. Fill the expected answer in the Radio Answer text field and press SET, then activate feedback answering by checking the box.
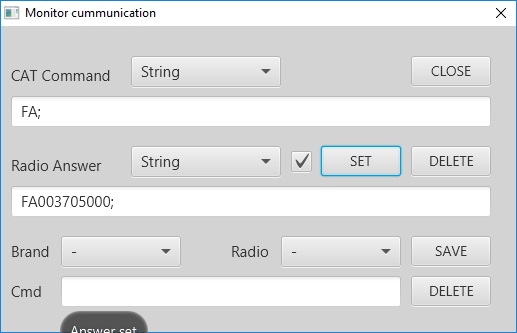
Now set some other frequency in Pocket RxTx, ex. 145.225MHz and then activate feedback in PocketRxTx.
You will see how the frequency displayed in Pocket RxTx will be automatically changed to 3.705MHz. This is a way to can test individual commands that receive radio feedback.
Monitoring data is saved in a separate configuration file which is named “mon.cfg”.
An example of mon.cfg is shown below:
#Wed Jan 19 22:50:45 EET 2019
-=-
Kachina=505DSP
Icom=IC703,IC718,IC746,IC746PRO,IC7000,IC7200,IC7300,IC7400,IC9100,ICR7000ICR71E
Kenwood=TH-F7,TS2000,TS480,TS480SAT,TS480hx,TS570,TS590,TS870
CMD46413134353232353030303B=Yaesu,FT991,Set frequency to 145.225 MHz
;=
TEN-TEC=Orion
CMDFEFEAAE0161201FD=Icom,IC7300,Set AGC Fast
Elecraft=K3,KX3
CMDFEFEAAE0161202FD=Icom,IC7300,Set AGC medium
BRANDS=-,Elecraft,Icom,Kachina,Kenwood,TEN-TEC,Yaesu,Mini
ANS46413B=46413030333730353030303B
Yaesu=FT100,FT1000MP,FT450,FT817,FT847,FT857,FT897,FT950,FT991,FTDX3000,FTDX5000
CMDFEFEAAE0161203FD=Icom,IC7300,Set AGC Slow
Mini=SW2012,SW2012c
Again, the format is self-explanatory. Commands are represented in HEX format.
Version 0.1 (Feb 27th, 2014). First public release of the application
Version 0.4 (Aug 20th, 2014)
- added secure authentication support - can be used only when using the PocketRxTx Android application as a network client
- added full data encryption support (experimental, buggy)
- added audio support (for the moment only in the GUI, not functional yet)
- detect network disconnection and go back to "waiting for connection" mode (yellow background)
Version 0.8 (Aug 23rd, 2015)
- added bidirectional audio support with mic level meter
- name changed to jAReC, From (j)ava (A)udio and (Re)mote (Control)
- version number set in sync with the Pocket RxTx Android application (for compatible features)
- deactivate START button when already started and STOP button when already stopped.
- changed design of and increased size of icons for security and audio settings
- auto-start function added
- reconnect to COM port and restart server if any configuration parameter changed while connected
- 128 bytes symmetric key used for password encryption (instead of 64 in the previous version)
- changes to ensure compatibility with Java 8
Version 2.0 (Jan 9th, 2018)
- added PTT support using CAT, RTS or DTR, on the same as CAT or different COM port
- added PTT timer (to limit transmission time to prevent locking the transceiver in TX if something happens with the network link)
- heartbeat to check at ~8s the link between PocketRxTx and jAReC and restart into listening mode if network link dropped.
- Added RTS/DTR power for the serial interface (eg for FT-991)
- when in Rx Mode, the bargraph changes from Mic to Spk and displays the Rx audio level
- added ability to have custom commands/scripts to run on PC triggered via the CAT command link (only with the Pro version of Pocket RxTx)
- Added Monitor mode to help with writing/debugging radio config files (monitor data to be sent/received over serial CAT)
- changed to run audio over UDP (with lower latency), using the same port number as the TCP one for CAT
- display all local IP addresses in the main window
Bugs solved:
- if using authentication on jAReC and not enabled in on PocketRxTx, CAT does not work but audio link is started.
- bidirectional audio support with mic level meter
- solved the combo box click bug
- sometimes mic level freezes to the last value even in Rx
Version 3.0 (Jan 14th, 2019)
Onlyto be used with PocketRxTx v3.x (not compatible with Pocket RxTxv2.x)
- support for PocketRxTx configuration, memories, debug log and call log files transfer (import/export)
- changed app menu format
- default mon.cfg file automatically created if not existing
- GUI controls are now disabled when in Import/Export mode
- Import/export can now be used even without a valid COM port
Bugs solved
- if you connect, then disconnect from PocketRxTx and then try to reconnect, you get an Authentication Failure.
jAReC_v3.0.pdf Bucharest, Jan 19 2019 – © Dan Toma – YO3GGX – yo3ggx@gmail.com